Description
About This Video
Transcript
Read Full Transcript
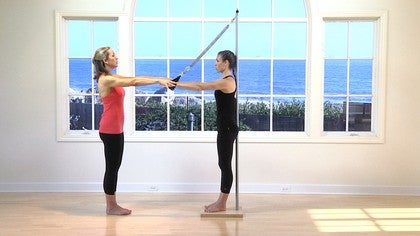
Hello. My name is curious Saban. I'm, I'm director of Fletcher Pilati Center National and I'm here today to present a, not really a workout but more of a workshop on the Petit Pole. Um, this is the [inaudible] that run Fletcher designed. It's manufactured by balanced body. And what makes this pedicle different is the shape of the base. So it's a kidney shaped base, um, and the reason for the shape of the base is to give, uh, inform where the feet should go. So it's, it's, it's basically a [inaudible] fee position and we want the second Cho to go to the apex of the curve of the Peda Pole. And then as the spine is lengthened up against DePaul, so we won't be using this particular pedicle today. Um, simply because it's not mountain, we'll be using the pedal pole with a square shaped base because it is more stable, um, for, for this application, several of the working on the pedal pole today. I'm curious, Savan director of Fletcher Palase and this is Debra Mendosa and I'm delighted to have her with me here in Santa Barbara in this beautiful, beautiful setting. Um, so what I'd like to do to have, if you would please stand on the pedestal base and let's stand first so that the, um, back is away from the pole.
And so the first thing we want to do is just look at the standing alignment because the pedal pole is more about alignment than it is about upper body strength. And um, so we want to look at the curves through the spine. We want to look at the pelvic placement and, and also the placement of the head and the neck. So Deb's pelvis looks to be like, it's an in a very stable, neutral position. Um, she has a nice lordotic curve. It's not accentuated. It's a long gated. Um, maybe we could get a little more length through the thoracic spine and then she has a slightly forward head, um, from two kids, lots of desk work. And so what we'd like to do now is look at the spinal alignment with the spine up against the pole.
So bring your heels to the base of the pole and come to a slightly turned out position and scent. And so coming at this gives a lot more feedback. We can see what's happening through the lumbar spine, through the thoracic spine, and also through the cervical spine. And so in this position, what we want to do is just inch the heels forward as much as we need to to give her a sense of actively elongating along the pole. So that active elongation will start from here with the lift up and out of the hips and opening of the chest and an active length through the neck.
How does that feel? Does it feel like you're actively lifting through here? It looks that way. So what I'd like to first is just breathe in this position. So just gently round your arms by your sides and then just inhale, open out to the sides and exhale centered. And think of the lateral breath coming into the sides of the rams. And then exhale, draw the ribs down the trunk.
And as you inhale, feel that broadening through the chest. And each time you exhale, try to get a little bit more of your spine lifted up against the pole without tucking the pelvis. And let's do that two more times. Inhale and exhale. And last time, inhale [inaudible]
And breathing into the lower thoracic spine as you open out to the sides. Take a deep breath in. Yeah, in Tex Hale. So we want to breathe right into here. Inhale, open, still feeling the stretch across the chest and grow longer as you exhale two more times. Feel the breath in the back. And exhale. One more time. Deep breath in. Feel the width across the back, and then grow longer out of the front. Draw the shoulders up and exhale the shoulders down and just image the scapula lifting up alongside the pole and exhale.
Press down into two little pockets. And again, lifting up, pressing down longer through the neck. Last one, lifting up and pressing down. How does that feel? Do you feel balanced to the shoulders? That looks nice. Okay. So now that we have that sense of where you're standing, alignment is let's come to a seated position. Um, so go ahead and shift away from the pole and come down into a seated position. So your hips are right up at the base of the pole. Soles of the feet are together,
And then think of using a little bit of oppositional energy by pressing down into the knees to feel that engagement through the back and the length up through the waistline. So again, feel the lateral breath breathing into the sides of the ribs. And as you exhale, grow longer through this, fine. And again, breathing in and exhale. Let's take that two more times into the sides of the ribs. And exhale last time. Deep breath in, and exhale. Does it feel different in this position?
Little longer. Wonderful. Okay, so now when I'd like to do, to have as a spine stretch, and let's take the spine stretch in four breaths. So think of bending and peeling your upper back away from the pole. Then the middle back, lower back. And we'll come all the way down into a full contraction. Okay, so inhale and exhale. Think of lifting up to begin to bend forward and take your next for us to here and then peeling right through here.
And so we want to go for that even curve through the spine, hollowing through the front of the body. Take a breath to deepen this position and then take four breaths to roll up. Rolling up through the lower back, rolling up through the middle, back, rolling midway up through the ribs and that it can actively lengthen up through the neck. Let's do that one more time. On four breaths. Up and over and up and over and peeling the body forward. And again, that Nice even curve and rolling up one and two and three and four and lengthen up. Beautiful. So let's do that same movement. Now on two breaths. Inhale and exhale. Halfway down.
Add another breath to complete the movement. Hollow through the front of the body, a full breath to roll. Halfway up and the next breath to elongate the spine. And again, up and over and again, up and over, hollowing through the front, deep in your inhalation to a long get your exhalation and rolling all the way, uh, one breath to curl forward, one breath to roll up. You feel that breath into your back and lengthen through the sides of the body. And again, full breath to curl forward and a full breadth to roll up, especially this part of your batch as shoulders down. And again, draw the shoulders out and pull them down, lengthening the neck and shoulders up and down.
You don't want to do that too. Quickly. Inhale forward, gliding and exhale back and find that alignment and again, glide that Chin forward and draw it back.
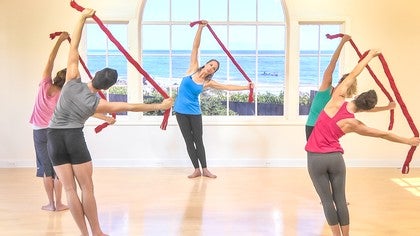
So reach up for your straps if you would. And I'd like for you to start, um, with the palms facing forward and allow the shoulders to lift up and think of the scapula lifting up. So all we want to do is just find that that placed a position for the shoulders. Exhale, draw the shoulders down and think of widening the chest as you do so. And again, inhale, lift up, stretch the springs by pulling from your back.
And again, feel the inhalation lift and the exhalation. Pull it down two more times, lifting up a little deeper exhalation, pulling down. Last one, lifting up and pulling down. And then from that anchored position, continue that movement reaching down to the elbows or the upper arms form one straight line across. And then from here, take a deep breath in and pull the arms down so they form a w shape right alongside the body. So the elbows are all the way to the waist. Inhale to that go goalpost position and exhale to the WB, pulling from the back. And again, inhale to the goalpost.
Feel the length through the spine as you pull down to the Deb you one more time. Inhale to the goalpost and exhale double down. So let's those two movements together and held to the goalpost. Exhale to a long gate, the arms, keeping the shoulders anchored. Inhale, draw the shoulders out. Exhale, pull them down and held to the goalpost.
Exhale to the w she held the length and the lift through the body. Inhale to the goalpost and extend the arms without lifting the shoulders. One more time. Shoulders up, shoulders down. Find that straight line across from elbow to elbow out and hold down. Inhale to the goalpost and extend the arm and then come down. One more time. Inhale, lift, exhale, draw the shoulders down and then pull down to that goalpost position.
Shh. And then let's hold this position. And what I'd like to do is think of spiraling the arms in and out. So from this position, first rotate the lower arm and then from the shoulders, draw the arms in without closing the chest. Inhale, rotate the upper arm. Exhale, stretch the chest and let's bring the palms to face out. Inhale, rotate and exhale and stabilizing the shoulders from the back.
And again, rotate and feel that stretch across the chest two more times and rotate and expand the chest, keeping the arms at that level. This is a lot of work. One more time, rotate and, and, and then holding this position. Take a deep breath in and again, a long gate, the spine as you draw your arms down by your sides, feel that lift and heel to shoulder height and exhale, draw down to lift up and out of the floor. Two more times. Inhale, lift and exhale. Feel the length last time. Inhale, lift and exhale down.
And then try the elbows to shoulder height. And continue that movement, reaching up, rotate the arms and carefully release the straps. All right, so the next second is standing with the springs. And again, the pedal pole work is very specifically about the spine. And so we want to again look at the spinal alignment and it's not about the spine into the pole, it's about lengthening up out of the hips so that you narrow the distance between your spine and the pole. So let's reach for the straps and extend the arms forward. And ideally we start with a little bit of tension in the springs. And what I'd like for you to do from here is just inhale, glide your shoulders away from the pole, and then again, image the Scapula, image the shoulder blades, and place the Scapula on your back. Inhale, glide forward and exhale place.
And let's do that two more times. Inhale, glide forward and think of drawing the armpits down. One more time. Inhale, glide forwards and exhale place. So let's go all the way into retraction. Inhale, glide forward, and then exhale. Think of wrapping your scapular round the pole in hell. Glide forward into protraction, and exhale, wrap the shoulders. Let's do that one more time.
Inhale, glide forward and exhale ground. So finding center. Inhale, glide forward and find that centered position with the scapula placed on the back. Thank you. Lovely. All right, so from here, take a deep breath in and exhale. Press your arms down by your sides. Inhale, lengthen further. And exhale, lift your arms from your back and he'll prepare. And exhale, press down. Feel that reach. Inhale, lengthen further out of the shoulders and lift from the back. And again, deep breath in. Exhale, press down.
Feel the lift up through the hand, reaching longer. And exhale last time. Deep breath in. And exhale, press down. Feel the length through the neck, reaching long through the fingertips. Deep breath in, and exhale. Lift up.
This time. Let's take a full breath to press down, keeping the arms down by your sides. Take a full breath to reach a little longer and the Tricent presses bend and extend. Think of a hinge going straight through the elbows, keeping them fixed in space. And again, bend and extend. Beautiful at keeping the shoulders down two more times.
Feeling longer with each press, last time bend and extend. And just alternate those two movements. Inhale forward and exhale, bend and grow long. Nice through here, forward work from your back bend and from the triceps. One more set, reaching forwards and lengthen. Bend and extend. And then keeping that reach through the fingertips.
Simply rotate the arms to face the body and let's go glide the scapula up and reach down and just feel the arms slide up and down the sides of the body. Stretching the sides of the neck. Two more times. Lift and press all the way down last time. Lift up and brass and then just reach one arm out to the side and press it down and reached the other owl.
This time as you pressed this arm down, think of this arm pressing the other arm out, staying centered on the pole and press out. Good arriving at the same time, shaping the chest open. And let's do that two more times. And again, last one, opening to the side. Shannon, press both arms down by your sides and get a little extra length out of the shoulders. How are you doing? Good. Okay, so let's do the arm opener. Keeping the hands glued into the sides of the body. Inhale, reach the elbows out to the sides. So inhale, exhale, close. Feel the width of the ribs, opening the arms, and exhale close.
And again without gliding the hands up and down the legs. Exhale, close. And again, reaching out and close. So all of this is coming from the back and out and hold this position. So keeping this rounded arm position again, feel the breath, open the arms. Inhale open, and exhale. Squeeze.
Moving from the breath into the arms to press out and the arms. Press the air out and again, open. Feel the width and press
So just release the straps, bring the arms down. By the sides. And let's glide the shoulders up and around and uh, at around one more time, up and around. So what I'd like to do, Deb, is do the same arm opener, but now we're going to go into the one lung breathing. So the arms are rounded by the sides and feel the breath into one side. Open that arm out to the side and close. Okay. Do you feel okay? Good.
So the arms are straight ahead and pressing all the way down. Rotate the arms and reach the elbows. Feel that expansion cause sweat. Start by breathing into your left side. Inhale, breathe into the left side and loves, and then breathe into the right side. Feel that isolation and close and again, breathing into the left shoulders.
Stay down and close and then breathe into the bright and close. Now with that focus on, on the even breath, into the sides of the body. Again, O open and close. And again, open evenly. Work more from your bat. Last two, all open and close. Last one.
Field that lateral expansion and close extending the arms. Rotate the palms to face. Back in the a hundred speech with a four for breath and four breath out,
Okay.
Are you doing good little fatigue? You're okay? Little. Okay, good. So just putting a little bit of pressure down to the straps. What I want you to do is feel the breath again into the back as he bring the arms to parallel and exhale open, closing the base of the ribs and feel the breath into the back. And as you open the arms, close here, y'all that stretch two more times forward and open the chest last time, forward and open. So how do you feel about going into the place? Okay.
So keeping that engagement into the back, let's just make a very small demi play, a full breaths to go down, folding into the hips and a full breath to lift up. So we're watching for the pelvic organization and to make sure that the spine stays long on the pole and up, folding into the hips. And uh, last time folding into the hips and lengthen up. And again, try the shoulders up and reach out and reach the shoulders up and lengthen out. So let's take two breaths going into the ground play. All right, full breath into the [inaudible] and release the heels and come all the way down and then full breadth to the Deming and then draw the legs together. Keep the wet, jammy.
[inaudible]. Release the heels, keep that angle in the hips and the legs and Jamey. Play a show and come up one more time and down. Keep the rate and then reach the heels. Shh. Try the legs together.
Um, so this is a pattern that Ron developed in the last year of his life. Very simple but powerful. All right, so reaching the arms forward and open the arms out to the sides. Let's take a full breath into the demi please. [inaudible]. And then from here, just a full breath to curl the pelvis and a full breath to lengthen the pelvis down. Bring the arms slightly forward, a little bit further forward there. I think you're going to feel more connection into the back and again, curl the pelvis and then feel that act of a long gay shin to place the pelvis down and again, curl the pelvis and actively along gate and then draw the legs together, coming all the way up. Good.
And just draw the shoulders up and place them down. And Ken, shoulders up and place them down. So we'll add the upper contractions. Then we'll put the two together, full breath into the play, and a full breadth to curl the upper back away from the pole. Well put deeper contraction and then again, see all that a long game option from the belly to live too. And again, curling forward. She the connection of here and rolling up.
Keep the length through here. Last two, curling forward and lengthening up, placing the spine last time, curling forward and lengthening up and place the spine and then draw the legs all the way up and together. Okay, so we'll go into a combined pattern. Okay. Okay. I'd like for you to start a little bit more in the t so not all the way out. Draw the ribs down. Full breath into your play. Curl the pelvis, lengthen the pelvis. Sure. Yeah. Well arms forward. Exhale, upper contraction and rolling up through the spine.
Inhale, open. Exhale. Full breath to lengthen. Sh in health forward. Abra contraction. Full breath to lengthen. One more time. Open and curl the pelvis.
Lengthen out. Shh. Forwards and opera contraction and rolling up and draw the legs together. And really she's the straps. It's a lot of shoulder stabilization. Good. So how did that feel? Adding the effort, lower contractions together to elongate a lot of control.
A lot of control through there. Okay. So, um, we'll go into the roll downs. Okay. Little bit more. Alright, so reaching the arms forward.
And then actively lengthen through the awkward that draw the shoulders. Ah, press them down and up and try to feel a little bit more of that. Wrapping down. One more time. Lifting up and down. So let's do that version one more time. That's it too.
Three [inaudible]. And for going into that long, that's long, curved. Stretch your arms long out if your back beautiful to feel secure. Can you like finger toes a little bit and rolling up through the base of this fine. Shh, that's middle back. I had said she had come all the way out.
She had again shoulders and wrapped to trash down. Got So Deb, let's go into the hinge pattern. Um, so instead of rolling down, do you want to release these? Let's release these for a second. It's a lot to do all of this. So normally what we would do is teach one of these pieces in isolation, maybe not the whole program together. Um, so let's just roll the shoulders and again and down reach for the straps. So this piece will be a hinge at the hips.
And what we want to try to do is think of taking the Pedo Pole with you. Okay? So folding at the hips, um, it's a, it's a hinge line and then rolling up the same way you just rolled up on the last two arms are straight ahead. So the fold is right here. Full breath to lengthen out into a hinge and stretch. Bring the body parallel, reaching long through the fingertips, parallel to the floor, and then rolling up through here.
Out of the hips, h outbound touches and rural all the way up. Shoulders down. Beautiful. Shoulders, arms and shoulders down. Let's do that one more time. Folding into the hips. Feel that long line straight out into the room and rolling from here. Opening up the front of the hips. Reach the lower back, reach the middle back and up to the upper back. Feel the lift through the crown of the hajj.
And again, shoulders up and, and just release the straps. Okay. So let's just keeping the feet where they are. Just shift your weight forward so you're over your feet and your spine does look a little longer. So I think this is more pedal pull work than you've done back to back in a while. How does it feel? I feel tall. Good, good. All right, so let's do one piece off the base.
So what I'd like for you to do is turn around, so you're facing the pole and stand with the legs together and called bone streamlined ad. And so that, the whole idea with Palladio's is that we take it with us. So you now have that Paul right behind your back reaching forward for the straps. And so we want the pole, the spine in the springs to all be in parallel lines from here. Take a full breath to press down so it's a little more weight in this position, all the way down by your sides and I'll hold on to it. And then a full breath to lift up, shaping the weight in the heels. Full breaths down.
Full breath to press down and lift up to relevant a good. Lift the arms and lower the heels at the same time. Full breath. Press down and lift up and lift the arms and lower the heels. Does that feel stable? Okay. Just a little hard. Alright. And full breath. Press down, opening the chest, lifting straight up, fingertips to the floor. That's it.
And lift the arms as you lower the heels. One more. Yeah, and good holding that position. Reach long through the arms and lower one heel down and lift up the other heel down and shush. Lower and lower and left for more shoulders, three and two and yes, last one. And press. Hold it. Deep breath in and lower the heels as you lift your arms up and release the straps. Nice work. Okay.
All right, so let's just end with some breath. Take a deep breath in and out, and again, deep breath in and grow longer. Two more feel the expansion. Last one. Thank you very much.
Pilates Legacy Project - Playlist 7: Ron Fletcher Practices
Mention
 |
Kyria Sabin (Teacher) |
 |
Desgeorges C |
 |
Silke L |
 |
Jude |
 |
Penny M |
 |
Gyl Z |
 |
Ursula C |
 |
Mary Liz R |
|
|
Elayne Connery T |
 |
Jennifer S |
 |
Carol L |
 |
Yeong Cheol C |
|
|
Cindy Y |
 |
Susie W |
 |
Corinne M |
|
|
CJ |
|
|
|
 |
Joanne H |
 |
Kristi Cooper |
 |
Holly Holland |
|
|
Femke D |
Comments


 . Thanks for offering a Ped-O-Pull work-out on PA!


You need to be a subscriber to post a comment.
Please Log In or Create an Account to start your free trial.