Description
About This Video
Transcript
Read Full Transcript
So we're now ready for phase two and this is the real introduction of Pilates into the protocol for the total hip replacement at two to six weeks. And I've asked Shelly to be with me and just to make everybody aware, especially aware during these times if you're seeing this after 2021, you know we all have to take safety precautions. I've been immunized and Shelly's wearing her mask, that we encourage everybody to do both of those. And I've asked her to help me out with this one because I can't do it by myself. And I wanna start out with the trapeze exercises.
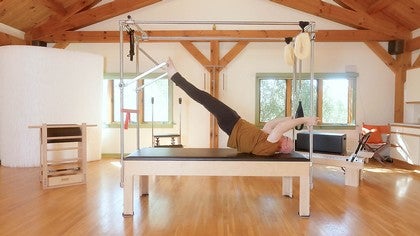
And particularly the 90/90 that we do in Polestar, I think is one of the best places to start with our patients with total knees and total hips. So we're gonna jump right in. Shelly's gonna help me get in a position. I think you need to make note of a couple things. I mentioned that I'm gonna need her assistance to be able to flex my leg up, to get into the springs.
And then also just a little bit of some gentle oscillations with the leg to be able to start getting some range of motion back in the hip, the two to three weeks after surgery, okay? So you ready? Ready.
So this is what we call a 90/90 position, and literally it's just suspending the leg in space. And so even though I can do little bits of movements with it, often what I'll start with and ask Shelly to do is just gently push into the range of motion and get me used to having the hip moving again. I think this is an area that so often we're so scared of it. We're scared of that first movement of the total knee or the first movement of the hip in the environment. And this is just a very nice gentle way that you know they're not gonna drop your leg.
I know she can't. She could let go, my legs is not gonna drop it's still suspended. So I don't have the fear of losing that. And yet I'm starting to feel the effect of the springs that are assisting me in deflection and supporting me into a little bit of extension. So remember what I said about the precaution.
The precaution still continues that I don't wanna be having people actively lifting their legs up at two weeks, three weeks and we need to get them so that they are able to feel that movement. And even now I can start doing almost as a if I pushed down, the spring brings me back up into fluxion. My muscles are relaxed but I can use my hip extensors to initiate the rhythm, okay? So again, 90/90, very solid exercise. So let's help me get out of 90/90.
Good and I'm gonna leave the straps on because the next exercise, say I'm progressed a little bit is actually being able to do a long spring exercise, right? So here again, I'm not quite ready to go into maybe feet and straps yet but I can start doing some long spring work with a yellow or a purple long spring, depending on the weight of the leg. So the muscles that I'm using right now in this long spring exercise is by hamstring pushing down and I could allow the knee to bend and straighten underneath it and just start getting a feel for that because it's just me relaxing my quadriceps, the knees flex in towards the chest. I straighten my quadriceps and he goes back down, right? So this muscle still is staying relaxed through this whole exercise.
And from here, we can start working in some of the different, you know I can work a little bit of abduction and abduction in that range, my leg's fully supported. I'm not gonna go anywhere that I shouldn't be going. I can try little tiny circles both directions and very successfully move into that position. So now when I take myself out, I can either hold onto my leg, let it back down, et cetera. So on the trapeze table, we can also do the breathing exercise and the tower bar with footwork.
So we can connect the tower bar and this is sort of that progression. You're not gonna treat them like they're at that same stage through the whole six weeks, right? So we're gonna start off now advancing things. And if we can see the work that you will be doing on the reformer as well of footwork and feeding straps it makes sense of how we might use the tower bar to be able to support the legs. So again, coming in, by now, what I was doing is I was already in a position where I learned how to get my legs up and to be able to use the support of the bar and to be able to, again getting the awareness tower bar push throughs you could also spring the tower bar from below and be pushing up into the tower bar.
And again, you're gonna do all of your safety precautions. If I was a little further back, I can get a little more range, right? And typically when we're teaching this at this early phase, Shelly would have her hand on my foot holding onto the bar making sure that the bar is safe, okay? And I think that's about all that I like doing very early on. Again, you can start doing all of the upper body work, other things that you would be doing on your Pilates well-rounded workouts, spine extension, thoracic extension, shoulder girdle work, all of the arm work.
You can be implementing a whole body workout already at this time just taking the precautions that we talked about. One of the props that I love to use is the spine corrector. And so the spine corrector (giggles) allows us to start introducing into some other planes of movement. And one of the ones that I like to go into is side bending. So we can get onto the barrel and have the leg very well-protected and just start working on some side bending.
Remember we said that the thoracic mobility in the different planes really helps take the load off of the hip. So we can just go into some nice side bending activity and even work a little bit of some active side bending to work abdominal muscles without having to do anything with the hip flexors. So I love being able to... And this is also sort of takes the place of mermaid. You know, they can't get into a mermaid position but they could lay over a spine corrector and started getting that lateral flection even if it was just passively laying and getting a passive stretch on it, or you can make it so it's a little more active, getting some active side bending into those abdominal muscles.
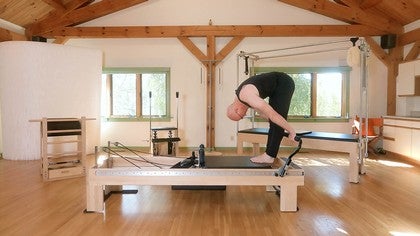
Another thing that we can do on here is in a seated position is we can start to work on our roll down, right? And if we keep our hands close here, we can work on going halfway down and start working on abdominal muscles, but we're protected here. So there's no hip flexor activity taking place but I am starting to work my abdominals, and I am preparing myself to go into roll ups and roll downs. And from there you could easily get rid of this and then go into things like you're pushed through series with the tower bar and other exercises that would continue to evolve from the spine corrector. The last piece I wanted to bring up here on the trapeze table is the UBE.
And though the UBE is not a classical piece supplies equipment many of us have been using it. And I find it very, very helpful for teaching us how to use our diaphragm to breathe again and also finding what we call so this unconscious awareness of our body. So we often call it sensory integration. When somebody has an injury to a nerve in their upper extremity or they have a stroke and affects our arm, we do things to try to remap the sensory cortex and reorganize what we call the homunculus which is when you ever look at a picture of the brain and you see the mapping, people put on it of the face and the body and the hands and the feet being very big, that's the mapping of the sensory. And often when we have injuries like this in the hip or in the spine or upper extremities, we have what's called smudging.
So the central nervous system particularly the sensory cortex gets smudged a little bit. And so we love the UBE to especially work with the central axial skeleton in remapping things especially after a surgery like the one we're talking about. So placing the UBE in a position I have a head rest in place. We'll get rid of this, and gonna come up onto the trapeze table and just sit on the very end UBE, right? And then coming back down and there we go.
So, in this position now I'm not interested in doing it exercises as much as I'm interested in just having some proprioception training through the body. So being able to bring the hands up and take one hand out to the side, bring it back up. The other handout to the side, what this does for us is it starts creating a challenge through the central nervous system to maintain the balance in the six degrees of freedom that the UBE challenges, right? So the UBE can tilt side to side, front to back, top to bottom six degrees of freedom. And so we start learning that now we can also, and again, I could do something where if I needed to pull my leg up even and start figuring out the balance, and what I would do in this case is maybe put the foot on a ball or on a block, but now have them start working on things like lifting their arm up and seeing what happens in the central nervous and the core, how it organizes.
I also could just let them rest in taking a deep breath. And the diaphragm breath forces that to relax. And often if they're dealing with pain still, for whatever reason, the diaphragm breathing will also decrease their pain. So it's just a great way, great tool to start introducing their organization of their torso, reintegrate the mapping of their hip and their pelvis and their spine in their central nervous system to be able to have better balance. And what I find most interesting is that their walking gets better almost immediately after being on the UBE one or two sessions.
So if we still saw some lack of reciprocal movement organization, just one or two sessions with that automatically improve so one of my favorite things. The last thing that I want to go into is the home exercises, and the home exercises we talked about in the pre-work some of these that I want to introduce to you. So the first one was one I was taught by my physical therapist in this same time period after my surgery. And the idea on that exercise was to do a partial squat. So and I see that I still have my ankle bracelet on, to do a partial squat.
So coming down into that maybe a quarter squat is what it was, and he said, "Try to keep your right leg facing straight forward and then open up your left leg and the pelvis around. So you never let this leg collapse in, you keep it there and then bring the leg back. So it's just a, we call it a Tai-Chi step, side to side and the pelvis is rotating around the stable leg. Now coming out of surgery I could not do this at all that first two, three weeks. And then I started practicing every morning in my shower and what I realized I started really getting some great strength into the rotators and into the buttocks muscle in the leg.
And so it gave me a tremendous amount of confidence within a month of being able to pretty much address any exercise, including going up and down stairs, most of my walking activities, et cetera. So again, if you think of sort of like what you might see in a Tai Chi move and I don't teach Tai Chi, but I love this exercise and I do about 10 repetitions of it. So you can join me and practice it. You probably need to do it in front of a mirror really looking to see that the lower extremity that you're weightbearing on stays in that parallel position. Even though my pelvis now is 45 degrees, come back open up to the other side.
And the slower we do it, the more challenging it is. So you've got a couple more of these that you can do. And again, I just love this exercise. One of the things to watch out for is trying not to go into a tuck. I've noticed in a tuck, just like our half squat in Pilates and in particularly in Polestar that we talk about in our screening, it really is just dropping straight down into it and then switching.
So I don't change the height of my head. I stay in that half squat and again, 10 or 15 repetitions building up really strengthens that up. So I hope you're feeling that, and you'll probably feel it even more tomorrow. The other home exercise is getting back up onto the trapeze table and going into the quadruped position. And if you remember in the quadruped position that we started with wide knees, and we just were doing very gentle pivots back and forth.
So here, I don't want any big movements, this is the same kind of thing like the 90/90 and this is how we keep the load. So when you have a closed chain kinetic and you're able to keep the weight into that your proprioception increases very quickly. And that's what we're looking for in this early stage. The three to six weeks stage is having that proprioception restored where you no longer have your normal bone or hip you have an artificial hip in there. So we have to rely on other messages coming from the tissues around the hip, to be able to do that.
And again, I would just stay out wide or externally rotated. I would not go into the knees in yet at this stage of the game. And again, I would not worry about the range of motion right now, I'd be more concerned about just starting to get some compression into that joint and some awareness of the soft tissues and muscles around it. I also feel that this is a good time to start doing some bent knee openings. So for the home exercise program in supine now we can introduce the movement we couldn't do before.
Remember in the phase one, we were doing the wiggles. Now we can start opening and working into a range of motion again, in my version of the bend knee openings I like to keep the pelvis nice and quiet and just have them test it. Now, if they're having a hard time letting go of their adductors, you can have them or you can apply a little bit of resistance to the outside of the thigh. And that makes the inner thigh relax a little bit more. So you might do that with a little bit of assistance.
So again, this might be in week four or week five, they get the confidence, the springs have restored the range of motion, and now they're starting to get that control and that awareness with bent knee openings. And in the last one that we can start doing is even a little bit of knees side to side, and this is gonna feel delicious to us. With me, it was one of my favorite things was just to get a little rotation in my spine again, after being so sagittal for the three weeks, four weeks, and to actually feel the relationship between the leg. And again, this is also helping with things like getting in and out of a car, getting dressed, putting your clothes on being able to have a little bit of rotation and even starting to drive again. So these are some of the home exercises that I like to encourage the patients to do.
Alright. So what we're gonna do now is take a quick break and come back and take a look at the reformer exercises. Before we go there on the slide you'll notice that I listed some chair exercises and they are the same exercises that now you can reintroduce to your client or yourself that we did in the pre-surgery phase of the Pilates exercises. So it's gonna be the single step, single leg step in both planes with parallel externally rotated abducted and you can start introducing that and trying to reestablish the balance and the range of motion. So I will not be showing those again but if you need a reference to them, you can go back to the pre surgery phase and see those exercises performed.
So bringing the reformer into the equation in phase two weeks three to six in lab three, we're again looking at our primary goals of preparing to go up and down stairs, getting in and out of a car, even driving. We're looking at being able to dress independently and independently ambulating the community in these next couple of weeks and really establishing some autonomy for our clients. I think that's a really important mental aspect of this stage, where they no longer feel like they have to have somebody helping them in and out of a car. They don't need to have somebody helping them walk or they can just go out and go to a store or do those kinda things and be independent again. So in the reformer exercises, you'll notice that I put in there again, reinforcing the work that we did in the pre with footwork and feet and straps.
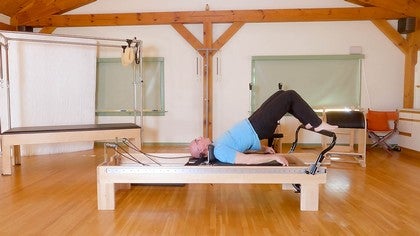
And again, hoping that they can recall some of those previous memories in their body and bring them forward into the new phase of moving post-surgery. So I'm not gonna repeat the footwork or the feet and straps but I am gonna demonstrate the bridging a little bit of seated arm work on the box and then I'm gonna introduce some standing work even this early on that I think is really important for them. So let's start with the bridging. So in bridging, I have three heavy springs on so two reds and a green in this situation because I really don't want the carriage to move right now. I put the head rest down.
So in this bridge I am interested now in the spinal articulation. So where in the pre and also in the phase one after surgery, I didn't really care if there was articulation. As a matter of fact, I almost wanted more of a non articulating bridge in their home exercise. But now I am interested in and finding that segmental movement mainly because the more mobility they have especially in the thoracic and the lower rib cage is gonna be less stress on the hip and the low back. And so that's one of our key objectives now is if we can get their movement distributing through other joints, they're going to be a lot happier with a lot less stress going through the tissues as they heal.
So one of our key principles in Polestar is mobility. And we say that by distribution of movement we create a distribution of force. So if we can get any additional spine mobility, the better. And another variation of the bridge here that I like is being able to sort of drop the sternum down a little bit and actually translate the pelvis to the right and to the left. It's sort of work your way down almost as if your pelvis was on a skateboard sliding side to side and just restoring some real nice gentle local wake up calls to things like the (indistinct) of the low back.
Great exercise to start with. From here, we can go into the box exercise. So I'm just gonna put the long box up on top of the reformer and just do some arm work to be able to challenge the core, challenge the torso in its movement that they might not be getting enough of because of the precautions of hip flection. And remember those precautions of hip flection are still in place. So I'm gonna go down to a very light red and blue spring for me and have them sit on top of the box.
And now we can start doing just some simple basic arm work with some bicep curls, and this starts strengthening up and what you'll feel is that your back extensors have to work to be able to do any of the exercises facing the head of the reformer. And those back extension are, is what we need in the endurance. It was something I was missing after the surgery, I had relied so much on the scar tissue around the hip that I didn't have enough endurance in the back extensors. So even though it looks like an arm exercise what's really working is my back extensors. And I'm also getting a nice workout in the arms.
I can do the crossover, and again, give them something that they can be successful at with some more advanced exercises. And again, primary focus on the back muscles. We can also swing around facing the foot of the reformer, and we can do things like serving the platter. And again, still now getting a little bit of abdominal work if they can tolerate this position, okay? I didn't have any mobility restrictions by the time I was at four or five weeks.
So again, use good judgment of what they can and can't do. But I love the whole arm series on the box, giving them some real (clears throat) challenges to their trunk but from their arms, not necessarily from their legs yet but you are getting their trunk ready for some more advanced leg work. The last piece that I wanted to cover on the reformer is standing. So I have the standing platform in already and this is very important that you prepare really well for this. So remember the home exercise of the Tai Chi is a great way to prepare before you would stand them up.
So this might show up in week six to do some standing where right from the beginning we're doing our abduction and our rotation. So if they're able to do this successfully and controlled, then they're ready to be introduced to the standing work. And again, maybe you wanna do the standing work on an Allegro on the ground, and maybe not up this high depends on how they feel about it. I'm gonna start with one red spring. And the key here now is that it's my right leg, I'm going up with the left one and coming up into this position.
And then just stepping out very safely with one red spring there's enough resistance to pull me back in, and there's enough resistance to give me a little bit of work going out into abduction. And right now, and again you'd have to make sure that you're in compliance with their physician's recommendations. My surgeon did not have any resistance to doing these Pilates exercises at this stage of the game. So again, you would talk to your own doctor but abduction is usually pretty safe. So in the abduction here, very nice sort of wake up call a little bit of load here, a little bit of load to the abductors as you spread out, you can then ask them to go into a little bit of a squat, which would be like the Tai Chi exercise of stepping out, right?
And we can also start introducing single side skating. What I would not do is do single-site skating on the effected leg on the carriage, right? They're not stable enough for that. That would come in phase three, okay? But in here, there's a nice, nice amount of load and it's pseudo close chain, close chain activity that's waking up the hip and waking up the lower extremity tying it into the whole body movement.
And then I mentioned going down, we go down with the effected leg, right? And use the power of the unaffected leg to let us down. So that concludes the new exercises on the reformer in phase two. Again, the idea is you wanna whole body workout. You're gonna use all the equipment.
You're gonna introduce a full array of exercises. These are just some ideas, and also bringing your awareness to certain unique things that somebody can do at this phase of post hip surgery. I did mention in the chair again that the single leg press in all planes and also the seated leg press on the chair are great exercise to re-introduce in this phase. And then again, precaution, I still would not do any resisted long or short lever flection against gravity of the lower extremities. But by now they're able to pick their legs up and they can do getting in and out of bed and mobility and onto the machines and lifting their legs up to put it on to things.
So what I'm referring to would be things like you're not gonna introduce the hundred, you're not gonna introduce leg circles, you're not gonna be trying to do the teasers or anything that would lift that leg up against gravity still as an exercise, but they are able to lift it up to get into positions for exercises. And that concludes phase two.
Me and My New Hip: with Brent Anderson
Comments
You need to be a subscriber to post a comment.
Please Log In or Create an Account to start your free trial.
