Tutorial #1848
Pilates Shoulder Positioning
Description
About This Video
Transcript
Read Full Transcript
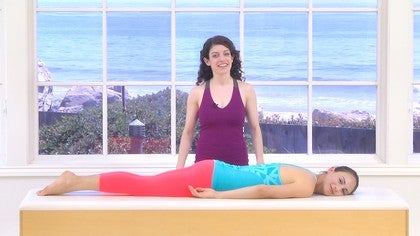
Hi, I'm Sharon Gallagher Rivera and I'm here with my lovely model, Kayla [inaudible]. Uh, she is one of the graduates from our teacher training program [inaudible] education lab. And we're going to do a little tutorial on how to get your shoulders ready for a polities workout. So this is a little more detailed information that you might not get in your regular class. So we're just gonna break down some shoulder placements. The first thing that I'm going to have Kyla do is roll out her lats, the muscles down the sides of the shoulders that feed all the way into the sacrum. And you can go ahead and set up. Let's set you up lower. Good.
And then you're just going to lift your pelvis a little bit and use your legs to slide yourself. You can lift your elbow up and you're going to roll lengthwise. So lift your elbow and roll. Yeah. And slide. So actually just slide along the side of your waist. Uh, pick your pelvis up and slide. There we go. Yeah. Excellent. Okay. So I find that, uh, we tend to overuse these muscles in the plot. He's worked for stabilization and then it disrupts how the shoulder really sits in the socket.
So that's why we're going to try and get this a little bit more lifted because what we're after really is decompression and we don't want our lots to drag our, our back down in the [inaudible] work. That makes it really difficult when we have to curl up. So then we're just doing a quick version of this. If you want to do longer, by all means, just take a little more time. Wherever you feel you need a little more attention, you're going to stop there and just do a little rotation into it. So you're going to rotate forward and back. Excellent.
And you can set your pelvis down. Yeah. Great. And I find, uh, especially when somebody has really tight lats, uh, it's tight, really close to the armpit, so that's a good place to work into. Great. Okay. And let's do the other side. Good. So first, just ruling lengthwise. Good. There are different types of rulers out there, there, squishier rollers, and then, um, I think the black rollers the hardest.
So the black roller might be a little tender to do this on. Maybe you could put a little something over the top of it so it's less, um, hard. The soft rollers. Great for this. Excellent. And then find your good spot and rotate into it. Nice. And that good spot might be different on each side. Perfect. Okay. So we kind of woke that up and picked it up.
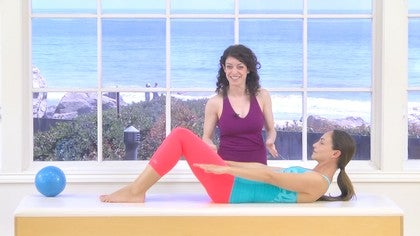
I'm going to have her come off of there and now you're going to go onto your back and uh, what you'd like to have is two pound weights handy for this. So I'm going to hand these to her, uh, right above her shoulders. Right? And what I want the weight in her hand to feel like is that that's the weight of her arm bones. Those are your humorous bones that it allows the weight of the humorous ones to really sit at the back of the skin, the back of the shoulder.
So from here she's just going to reach her arms up as high as she can, shoulder blades wide, and then let those shoulders just sit back down. Right. And inhale, reach up and nice. So as she's doing this, I'm just wanting her to keep her ribs down a little bit more so the back ribs inflate when you inhale and reach up and then when you exhale you want to try to keep that connection of the backwards, right. Good. One more and really drop. Yes. Now just the right arm, good and drop. And that will take you into a little bit of a rotation when you reach up and drop. One more time, just the right arm and drop left arm. Go all the way up and all the way down. Right.
Good. And we're just trying to get a little release, like really figuring out where the back of the socket is. Now switching alternating in the air. Right. And I want you to focus on the down more than the up so you can hear the sound of that drop. Good. And then start to speed it up the whole time. Those back ribs try to stay down on the, on the mat or on the table. Good.
Little faster and [inaudible]. Yeah. Nice. Keep going. Good. The challenge for this is to keep the elbow straight. Yeah, she's doing a really good job. See if he can get that right elbow a little straighter. Nice. Yes. And then we're going to go slow on inhale, reach up both arms and melt your shoulders back down, right. And the backward state into the table. Inhale, reach up and keep those backwards into the table and stay there.
So that's where the back of the socket is. And you want to know that position really well. From here, I'm just going to ask her to do little stirs and you want to feel that the stir happens from, from the bones, not from the big muscle groups. So see if you can let your pecs, the muscles in the front, relax as much as possible. Right? And then also let your lats, the muscles that push down the sides of the waist relax as much as possible. Great. Reverse those stirs. Make them even smaller. It's kind of like teetering around the center of balance.
Yeah. Nice. Great. Okay, so from there you're really sitting in your sockets. I'm going to have you bend your elbows wide. Good. And you can, especially if you're on a flat, uh, like on the floor, you can really kind of let those elbows drop from here. I'm going to have her stand in the back of her socket to bring the arms back to straight. So it's less of a feeling of pushing up and more of a feeling of leaning down and go ahead and bend right and stand on your arm bones. Beautiful. Yes.
So her pecs are really relaxed as she does this. She's using the muscles that hold the back of the shoulder together and great. We're gonna do one more [inaudible] and then stand on those shoulders into the table. Great. So I can just check. Yes, she's in there. So from here we're just going to challenge that a little bit. One arm is now going to go up by her ear and the other arm goes down by her pelvis.
And you want to imagine as if there's like a skewer that goes through both shoulder joints so you're not letting your shoulder joints change this straight across alignment. Then stand on the back of the shoulders to bring the hands back up. Beautiful. Yes. And switch. Good. You'll notice that there is a challenge to keep the balance of the back ribs down into the mat or the table as well.
And then back up one more time. Each side. Nice. And wherever your arm goes, you're trying to just find where's the back of the socket to leverage into to bring it back up. Excellent. From here, now we're going to take both arms back by the ears. So again, I just want to make sure her ribs stay connected down. Now it's very easy with the weight in the hand to let that shoulder joint get popped up off the table. So that's what you're really trying to not let happen.
You want to stand in the back of the shoulder and she's doing a great job right there. Try not to get picked up. So you got yes, stand on your arms, right and connect your back ribs. Beautiful. Right. That's what we're practicing here. Let's just do two more of those. So stand right. So there's a a thing I say often, which is don't hang. So there's a moment that a lot of us get to and then it just becomes a hang off the shoulder joint. So you want to find that place where you're still supported. Yes. Super Straight elbows. Great. And you can see it's, it's work. One more time.
Back rooms are down. Yeah. Fine. This one. Gorgeous. Okay. Now I'm going to have you go ahead and lay all the way down right now. If you don't have this type of range, then uh, I would say bring your arms back up, take the weights out of your hands and then come back to this position. You're working to have the arms all the way down, but you again, don't want to have that hang off of his shoulder. So stand on the back of your shoulder joint here and you're going to let your elbows drag down on the mat.
[inaudible] so she's keeping the whole back of her arm on the mat or on the floor and the back ribs. And then inhale back up by your ears. Right? And then standing on the back of the shoulder again. Beautiful, right? A lot of us have that one shoulder likes to roll forward. So you're just tuning into what your habits are and finding how to stay connected to the heaviness of the very top of your humerus bone. There's a little ball that fits in that shallow socket for your shoulder blade. And that's what we're trying to keep heavy, gorgeous.
So you're going to continue all the way down, unwind your arms, try not to pick your elbows up, unwind your arms all the way to your pelvis. And now we're going to do a full circle. Inhale up through the ceiling, back by the ears. Good backwards connect. Exhale, bend through. Lovely again. Soft pex. Move from the back of the shoulder. One more time. Inhale backwards. Stay down. Nice and [inaudible].
So she's gonna reach forward as far as she can. And then I want her to keep pulling that bottom tip of the shoulder blade forward around to the front ribs as the arm bone comes back as far as she can get it. Beautiful. Yes. And reach toward me. Good. And then keep pulling your shoulder blade forward around. Nice.
Perfect. So from there, from that nice supported shoulder, I'm going to have her pick that weight up. So now we're accessing these lateral rotator muscles. When the arm gets picked up again, you want to stay at the back of the socket, let it drip, let the top of your humerus bone drift back a little. Yes. Right. And then as their arm comes back forward, she's going to keep adjusting to make sure that it's sucked all the way back. Yes, like a really powerful magnet that keeps her there.
This hand is reminding her shoulder blade to stay wide. You're going to pick it up again.
So she's going to pick that up from here. I want the weight to drop your shoulder all the way back to the mat. It's going to take you into a rotation. Good. Now if your doesn't get close to the mat here and you're kind of hanging up again, do this without a weight. And then from here she's going to let her elbow come down and then straighten that arm out. Good.
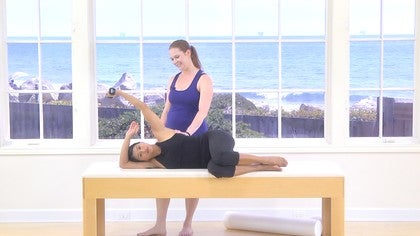
And actually she doesn't need the a pillow for this part so she can use her bottom hand. I'm gonna take that away. And then from here, stand on the elbow to bend it and then you're going to do the same thing. Stand on the shoulder to straighten the arm. Gorgeous. Now keep this weightedness of the shoulder and the spine brings itself back up without lifting the arm. Nice. Let that sit. Yes. Good. And she's going to bring that arm forward just to uh, strengthen those lateral rotators. Good. And then up. Nice.
Let the weight set your shoulder down. Gorgeous. And then the elbow and then lay the handout. Nice. And then lean on that elbow to straighten that. Good. And then lean on the shoulder. Good. Bring the spine back. Try not to pick the arm up as the spot. Yes, you're trying to let that arm really sit on the side of the ribs and then bring your arm forward. Drawing it back in the socket. Lovely.
One more time.
Gorgeous. And then from here where she's in this place where the shoulder blade is wide, pick your arm bone up and then let it just find that place where it sits on the side of the ribs. Good and up, and there's lots of choices. For some people the shoulder might feel like it slips up towards your ear. You want it to try not to go up to your ear, but just to go directly down on your rib cage. Good. And then when she finds that place that's really heavy. There she is.
Then you're just going to circle a little stir just to get that feeling of the magnets drawing your arms in and not all of the muscular work in reverse. Right. You using the support that's more intrinsic to the joint
And then I want her to do the same thing. Sit on the ribs instead of using the, the Sh, uh, lat down the side, the waist, trinity to that. Oh, you just sit on your ribs to roll the arm bone on the ribs to come back up, right? Yeah. And again, good. So I don't want her to shorten this space. I want her to keep this space long. And so she's going to have to find something else to bring that arm back up. Find the weightedness. There it is. Yes. Right, because we want the link one more time. Good. This is a great active lengthener to the lat. Actually.
It's an Essentra contraction. And then you're going to go back one more time. Keep your arm there, take your bottom hand, and you're just going to grab the upper part of your arm. Keep this underneath your head though. So it's like a box over your head, right? So now we're just gonna do a little specific tricep work. She's going to bend her elbow here, right?
She's going to keep this nice long lat and then straighten your arm by leaning on that bottom hand. Nice. And, and this is another thing I find that um, it's hard sometimes to separate the work of the triceps that we want to keep the arm straight from the work of the lats, which sometimes we don't want as much. Beautiful. And then bring from the straight arm, bring that arm back up to the ceiling.
So you're going to go knees into your chest. Great. Scoot forward a little bit more, right? And here you go. Nice. So the uh, weight is going to be forward. She's going to grab her shoulder blade with the bottom hand and I'm going to give her the pillow again.
Feel the muscles in the back of the shoulder and then come back down and right. And the practice is to keep finding the place that's in the back of the socket.
Excellent. And now we're going to take this into the rotation. So she's going to lift that arm up, let that weight take your shoulder down to the mat. Good. That bottom hand can come out and I will take the pillow away. Good. And then the elbow sits and then the hand lays out. Nice. And then bend the elbow, try to get that same heaviness of the shoulder here to straighten the arm. Nice.
And then she's going to keep that heaviness of the arms. The spine brings itself back, allowing the arm to sit on the ribs the whole time. That was gorgeous. Yes. And then arm comes back forward two more times for this one. And lift up. Settle the shoulder.
Good.
And I'm just going to help,
And then stay heavy here as you bring your hand back up. There it is, right? Yes. And again, nice super straight elbow. And then lean on the rib cage. Nice. And one more time and I'm just kind of digging my fingers into her. Let to remind her lat not to power the arm up. So we don't want it just to make that clear.
I'm going to have her do the thing that I don't want her to do. I don't want her to go ahead and engage your lat. You see how that slid down, this shorten and now we lost the weightedness. Great. Excellent. And so you're going to go back. Good. Take that bottom hand and grab your upper arm and bend the elbow. Great. So we're keeping this nice and long, engaging the triceps. Beautiful.
We'll do two more of those. Excellent. And then again, finding the weightedness to bring that arm back up.
The cerise interior is like little fingers that come around to the front reds that attaches from the bottom point of the shoulder blade. So it's a really important muscle for keeping your shoulder blades wide, especially if you're somebody who has a winging shoulder blade. So go ahead and let your shoulder, but it's kind of crashed together. Good to come out of this position. Try not to use your arms. You want to stand on your arms, but you want to use your shoulder blades widening around toward the front ribs.
So see if you can fill those bottom tips coming around. Nice. Yes, it's going to feel like upper abdominal work. Go ahead and sink because the serratus anterior becomes fibers of your obliques. So it's going to feel like it's strapping you in. Nice. And two more really gorgeous. So you want to try to keep the pecs soft on this? Uh, try not to push.
I'm going to have you go ahead and push and show what we don't want to do. Try not to push from the arm bones there and settle one more time. Gorgeous. So a little more challenging version of that is to do this on the forearms and straight legs or you could do straight arm, straight legs. Great. And so from here you're going to settle.
What's nice about doing this version is it takes the elbow joint out of the equation, so it helps you really isolate what's happening in the shoulders and in the abdominals.
So when there's tugging on those muscles, uh, they, they tighten and pull back to avoid being overstretched. So what we actually want is lift here and a lot of us were trained to push down there so it might feel a little counter what you are used to thinking about. So what we do want those, that those armpits really stay hollowed out and not flattened. So I'm just going to stick my fingers in our armpits just to remind her and we're gonna just practice that little Serita's movement here at the wall. This is a little easier than doing it, uh, prone on the, on the table on the floor. Nice.
So she's going and letting her shoulder blade sink together. Good. And then the bottom tips of the shoulder blades around to the front ribs. Right? And I'm just making sure she's not pushing with the arms and that was beautiful. So from here, what we're going to practice is this externally rotated arm that we use a lot in Pele's to do our side bending or kneeling side arms. I'm just going to practice how to keep that back and rotated.
So she's gonna use her other arm to help her externally rotate as she takes her hand up the wall. Try not to push down. Yes. So think armpit back, armpit back. And she really wants to push down because she has had so much dance training. Yes. Right. Excellent. And then from that place, pick your arm up. Don't push down. Yes. Now if you push down, you're gonna feel your armpit gets a flattened forward. I want your armpit to stay way back. There it is, and pick it up. Gorgeous.
Right? And then bring that arm back down. And we're going to just practice that on the other side. So her elbow is into the wall. You make sure that the arm is all the way back. So if you need to do another serratus connector, uh, go ahead and find that first. Feel the hollow of your armpit. Move back. Right. Good. And then from there, your other arm helps you try not to think down, right and try not to think down. Yes.
And then pull your arm back and there it is. There is her kneeling side arm, uh, and her, uh, mermaid arm and any of those that require that arm by the ear. The last thing we're going to do is practice the uh, shaving arm and the swan arm, which is going to be her back against the wall. Walk your feet forward so that you can really lean your, your pelvis, your whole torso back against the wall and the distance of the feet is going to be different for everybody. It's like a counterbalance thing. So just find where you feel comfortable and like you can lean against the wall.
She's going to go into a stick them up position here, right? And I want you to really actively press the back of your arm into the wall and you're going to feel the same. A challenge here to not let the top of that humorous bone push forward. So see if you can feel like the wall is a powerful magnet. If you have the habit of shoving down, remind your armpits to stay hollowed out, especially this one. Aha.
And from there we're just going to do our chicken wings, which is arms up. As the arms go up, naturally, those shoulder blades, those bottom tips come around to the front ribs. They hold the arms and then bend your elbows, keep pushing back into the wall. Excellent. And so this is really strengthening her upper back so that when she goes to do her swan movement, she has the strength ready.
She has an understanding of how to keep those arms back in the sockets. And we'll just do one more good. All the way up to straight. Can the arm bones be all the way back against the wall where you feel them? Right? And then just bring your pelvis forward, pelvis forward. You're going. Just do a little swan on the wall. Beautiful. There it is.
Gorgeous. And come on down. Thank you. [inaudible].
The Successful Beginner - Playlist 7: Movement Breakdowns
Comments
You need to be a subscriber to post a comment.
Please Log In or Create an Account to start your free trial.


