Description
About This Video
Transcript
Read Full Transcript
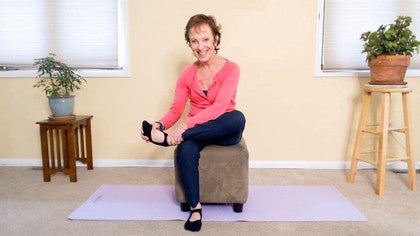
Hello again, I thought we could use a little foot massage today, so I'm gonna teach you just a short version, certainly there's so many different ways that you can use balls and rollers and everything to massage your feet and work your feet, but this one is user-friendly, you just need to be able to sit up on something, unless you're super comfortable on the floor, that's good, too. My hips prefer to sit up on this bolster ottoman. So go ahead and let's cross the left foot over the right knee, just so that when I say left and right, we're all together. And what you're gonna do is take your left hand and hold it just above the ankle bones, and then using your right hand, grab ahold of your foot gently, and circle. So you're taking your whole foot and circling it around the ankle, so one big circle, or not that big.
And you're using the left hand just to kinda keep the rest of your leg still, so that your lower leg isn't moving around. And channeling Eve again, we're always looking for smooth and soft, not yanking, not bullying yourself, not grinding away at yourself and grabbing and overly overdoing. So she always talked about space in the joints, space in the joints, so as you're circling your foot around, try to get in there a little bit with your mind, not just cranking around on something, but really feel into whatever that looks like in your mind for you, whatever pictures you've seen, skeleton bits, or whatever you think about that, however you wanna imagine softening and opening and releasing and hydrating and smoothing out rough edges, crinkly bits, and just soften into this space inside your ankle. And as you hold your own foot, you can go the other direction, really feel yourself, really touch yourself, don't just be grabbing on your foot. Feel your own hand touching your foot, feel your other hand touching your ankle.
Skin touching skin, flesh touching flesh, bones moving bones, muscles moving muscles. Make it really real, and be nice to yourself. So we've gone in both directions, and then you move your left hand to the center of your foot, so below the ankle, more on the arch area, same with the right hand. And now it's as if you could actually circle your forefoot around. So the left hand is there to keep you from circling around the ankle so much, and actually just try and get the toes, the metatarsals and the front of your foot, as if you could actually really circle that around and around.
Feel where it gets stuck, don't force it, make it smaller if necessary, and lighter. And then go the other way, I'm gonna just take you through this in a general kind of a way, and of course, you can spend as much time as you like, circling around, so we've done the big ankle circle, the whole foot, now we're doing the forefoot circling, and then we're gonna come to each toe. So you take your big toe with your fingers and you gently pull it, I've heard that the technical term for this is distraction. So you pull gently, you tug gently, give it some space right there where the toe joins the foot, and then gently twist it, don't crank on it, just gently twist side to side. And then go in between and take the second toe, same thing, gently giving it a little traction out from the foot itself.
Toes now twisting. I always think of the big size Tootsie Rolls, not the mini, junior Tootsie Rolls, but the big ones that have all those sections, and you twist each section off to eat it. So you're taking each of your toe sections, and you gently tug, feel the response in the tissues of your feet, in the bones of your feet there, and then gently twist it side to side. The fourth toe, pull and twist. And then the little toe, gently pull and twist.
And then bring the foot forward, and using your fingers, underneath the pads there, underneath the knuckles, the metatarsals, use your fingers to push up and then use your thumb to massage the five bones, the five long bones at the top of your foot, make a relationship there into the toes. And then when you feel like you kinda have that, bend the toes, using the fingers to push up from underneath, and the thumbs on top, and see if you can get each one of those little knuckles to show. That's it, and then cross the leg over again, use the left hand to pull back on the toes, and the knuckles of the right hand, just gently get in there and give it a little bit of a friction rub, up and down the sole of your foot, the heel. That's it, and then just see if you can shake it out, shake it out, shake it out, shake it out, shake it out. There's more we could do, but that's enough for now.
And then just take a second, whoa, feel the difference in the aliveness in the two feet. Okay, better do the second side. So take the right hand above the ankle bones, holding the lower leg relatively still, and then your left hand is now gonna help you circle the whole foot, softly, softly, softly, soft and round and space, space in the joints. Don't give in to the crunchies and the grinding and the tugging and the straining, send your mind in there and whatever images work well for you. Fluffy thoughts, oily thoughts, warm water thoughts, (laughing) summer breeze thoughts, whatever thoughts help you get in there and just enjoy the space, the opening, the fluidity.
Now, I kinda led you on that one with the word fluid, didn't I? Both directions, and then take the right hand to the middle of the foot, still using your left hand, different feet, different feelings. (laughing) And get a circular action, just the forefoot. That's it, get in there. Easy does it, be curious, it's amazing how different our sides can be, huh? And then each toe, Tootsie Roll toes, get your fingers on the big toe, gently traction, distract, as they say, pull it out and twist, twist back and forth.
And then the next one, if it's more comfortable for you to switch hands, switch hands. And then the third toe, see if you can get your fingers in between, sometimes the toes are tighter between. You never know what you're gonna find, it's always interesting. The fourth toe, just give it a little attention, let it know it's not stuck. And then the pinky toe, gently pull and twist.
And then bring that leg forward, using the fingers underneath to push up from the sole, and then use your thumbs, give yourself a kind of a general elongating guide, there's five bones in the foot, five long bones that come out into the toes, give them a little bit of direction, and then pressing from underneath with the fingers, you can walk around under there. And then use your thumbs on top to help bend the toes forward, see if you can reveal each one of those knuckles up through the flesh. Be gentle and specific. And then cross your foot over again, use the right hand to pull back on the toes, and the left knuckles, just gently give it a rub, all around the heel, the sole of the foot, and then let it shake, shake, shake, shake, shake, shake, shake, shake, shake, shake, shake. Good, okay, and now, if you had a wood floor that had floorboards, this would be kinda nice, because you could see the lines, but whatever you have is good.
Align your feet as best you can, and then let's just lift the right heel up, and imagine you had like a big piece of sidewalk chalk coming out (clicking) from your heel, keeping the ball of the foot centered and level on the ground, draw circles with that sidewalk chalk. You're gonna try to keep the movement of the thigh out of it. So if you need to put something between the knees, fists, whatever you want, but, you see, you're not letting your leg kinda wander off and around. So we're just making a circle there. And of course, you might be like, "Aha, I know what she's gonna say, "there's the verticals and there's the horizontals," and they're there, and so obviously you will have a shift of weight, but you don't wanna totally roll to the side, or to the side.
So keeping the toe pads nice and long, the thumbprint cookies of the balls of your feet, and then reverse your circle, whatever color you like, nice big piece of chalk coming out of the center of your heel and draw circles. And then put that foot down and lift the other one up, spread the toes as best you can, soft pads, strong ball of the foot, put your chalk in, or if you don't want the chalk, you could have a little thin pencil, a mechanical pencil. Circle in both directions, feeling the shift of weight, but not entirely lifting either the big toe or the little toe side, so nothing completely rolls side to side. Make sure you do them in both directions, and then let that heel come down. Let's bring the right foot back up again, and now, instead of doing a circle with your heel, you're gonna create an arc, an over-curve.
So you lift the inside of the heel, and you can see it go down toward the big toe, and then you arch across the shift of weight, but not the total roll, and then you come back toward the little toe side. Up the little toe side, over the top, and back toward you, big toe side. So you're creating an arc, an over-curve, inside your foot, it's pretty delicate. And then maybe try the under-curve. So you're reaching back through the outside of the heel, through the center, and back up and around.
So they're related, the heel circles and the two arcs, the over-curve and the under-curve, they're related, but slightly different. And everything feels a little different and everything has its own unique message. And so put the heel down and we'll go to the other side, lifting the left, creating that over-curve, coming down the inside, back up, over to the little side, down and back towards your little toe heel side, forward, up and over, down and back. So you get the length, you get the arc, you get the curve, you get the space, you get the fluidity, and then let's try the under-curve. Down across, and up, back down across, and up.
And then just shake it out. Slap your feet a little bit, and wiggle your hips. (sighing) Okay, now we're gonna move on to something else. Okay, so obviously we got rid of our chair or our ottoman. we're gonna do a couple more things for the feet, and this time, we're gonna lay on our back and have the feet up against the wall.
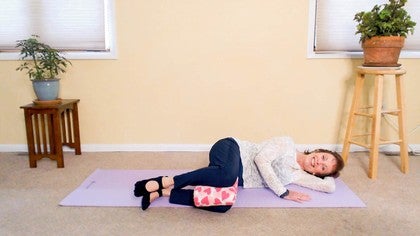
So lying down again, with your feet up against the wall, have a good bend. You'll be able to figure out how far away you wanna be after you've played with it a couple of times, your back, you wanna relax your back. This is Eve's inchworm, and of course, you can do this sitting in a chair as well. I like to show it on the wall because it's nice on the wall, (laughing) and you can really feel the release into the hips as well. So starting with the feet and legs, either together or slightly apart, whatever's more comfortable for you, you're gonna pull your heel up the wall, toward the ball of your foot, by curling your toes and engaging the sole of your foot.
And then you release that, and the pads of the toes go out again. So again, it's pretty tricky, you don't wanna scrunch your toes so much as keep the pads long as possible and the strength in the ball of the foot, and as you contract and shorten the distance between the ball of your foot and your heel, it draws the heel up the wall, and then you let it go. And you keep going until your legs are too straight to activate that action anymore, and then you reverse it. So the reverse is that you curl, but this time, your heel is the fixed point, you're pulling the front of your foot backwards, push off the ball of the foot and the heel will make its way down the wall. So you contract the sole of your foot, making it as much a little fist as you can, and then releasing the heel back down.
Drag the toes, release the heel, drag the toes, release the heel. And then let's go up one more time, the opposite, so you're pulling your heel up the wall by contracting the sole of the foot. The heel stays down, and you release the toes and reach up the wall. You pull your heel up by contracting the sole of your foot, keep the heel down, release the toes. Pull, release, advance.
Pull, release, advance. Pull, release, advance. And then coming back down, now the toes push off, the heel lifts and comes down the wall. Curl, push, release down. Curl, push, release down.
And there you have it. Now, go ahead and bring your feet and knees back together and we'll take the snaking feet. Again, you can sit on a chair to do this, you don't have to come down to the floor. Go back into your hips for a moment, that depth that you found, maybe even do a little heel rock back and forth on the wall just to free things up a little. That last one can sometimes be a little bit like nails on a chalkboard.
So you're gonna flex your ankle back, so your heels on the wall, and then feel deep down into the base of your pelvis, deep into the hips, and then externally rotate from way down in the hip so that you don't end up with your feet pointing out to the side more than your knees and hips. And then replace the ball of the foot to the wall. Lift the heels, pivot on the ball of the foot, internally rotating at the hip, and then press your heel back down. Lift the front of the foot, pivot on the heel as you externally rotate, and replace the ball of the foot. Lift the heel, soften into the hip, internally rotate, and you continue in this fashion, seeing how much you can keep your focus down into the pelvis, down into the hips.
It's a beautiful way of coordinating and communicating the timing and the movement between the ankle, the knee and the hip. And for me, that's it on one side, so I can't continue if my one side doesn't want me to go. So I flex back, turn at the hip, reach the whole ball of the foot back onto the wall, lift the heel, pivot back and forth. And I'm going obviously pretty slowly just for the clarity of it, you certainly don't have to. Let's do it one more time.
Pull the foot off the wall, pivot on the center of the heel, feeling the turn deep down in the hip, replace the foot, and alternate. And it's interesting because sometimes you'll find one leg starts to slide down the wall more than the other, always interesting things happening with our asymmetries. And then come back, try to get the whole heel to pivot, and then the whole ball of the foot to pivot, snaking feet. And then you can just, if your wall doesn't mind, you can just slap and tap those feet and feel the energy coursing through your body. Okay, so we'll have more things for the feet later when we do our whole body, but for now, just enjoy that.
Moving Meditation: with Debora Kolwey
Comments
You need to be a subscriber to post a comment.
Please Log In or Create an Account to start your free trial.


