Description
About This Video
Transcript
Read Full Transcript
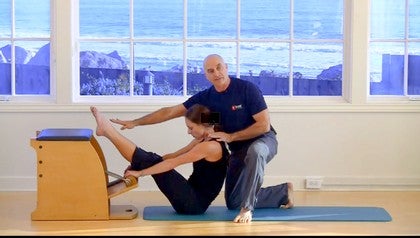
Hi, I'm Rebecca, and we are going to look at a couple techniques that you can use to deal with clients that may have some stiffness in their backs. I'm not talking about diagnosed problems, but just some general back tightness. And the first thing that we're going to do is look here with Mandy and see how she can, to begin with, just release the tension that may be occurring in her back. So I've had her in a supine position. This is the position of least compression to the intervertebral discs as well as the position that is very restorative for her back.
What's happened is she's just resting her thighs and her knees directly over this roll-down bar. So that her psoas is in a shortened position, in case it already is tight or irritated. And it also allows her spine to decompress, and allows the muscles in the fascia-- any kind of connective tissue-- to let go. So in this position here, I'm going to have you take a breath in, and exhale out. And I don't even have to be holding on.
It's very comforting, it's very soothing in this position. And now I'd like you to slowly lower your feet. And you're going to let your feet rise. So as opposed to say, a double knee fold, where she would be having to use her hip flexors in order to return her knees up to a tabletop type position, the springs here are serving as an artificial hip flexor. So she is now engaging the backs of her legs.
So the whole posterior hip complex is now becoming engaged in order to avoid the tension of the springs shooting her knees back toward her face. So, in other words, the back of her legs-- or the backs of her thighs I should say-- are working to control the springs. Let's do two more here. And she's breathing throughout. There's no core activation that she's preparing herself for.
She's just focusing on the fluid motion. And she's going to rest here. At this point I'd like you to slide to one side. And now slide back to the other side. So she's not going to be rotating through her spine.
She's actually getting a gliding action through the hips. So she's trying to keep the bar relatively parallel. And over toward me. So now there's a little bit more muscle engagement that is occurring. And toward me.
And away. And toward me. And now rest. We're going to create circles at this point. So it's still going to be pretty fluid, but now we're getting a little bit more into the pelvis, moving a little bit more into some rotation through the lower spine.
But again it should feel pretty soothing. You're all right here? And let's do two more. Another thing I want to mention is that as her heels are just hanging over, she is not having to activate her quads, which is very important. You're going to reverse.
It's very important because the quads are one of our superficial hip flexors. Remember you have four parts here to the quad, only one of which actually crosses the hip. So that rectus femoris muscle there of the quadriceps would be more active if she were trying to straighten her knees. So she's just dangling her feet over, which is also very soothing and comforting. And you can relax here.
So let's slowly remove your feet. As you do this though, I'd like to actually place your feet. So don't remove them all the way, forgive me. You're going to hang your ankles around. Yep, so she's just basically hooking her feet around the hooks here of the bar.
And now I'd like you to push downward just a little bit and allow the bar to rise. Now straighten the knees here, and hook your feet around, and push away just a little bit, just a tiny bit. And return. And push. Is that OK on your back still?
And return. And push. And return. Now bend your knees. And straighten your knees.
Straight up to the ceiling again. And bend your knees. And straighten. And again we're continuing to activate the posterior hip complex. Although that's a little bit more with the thighs.
Now we're going to get more of the hip complex as you bend your knees and lower your feet just a little bit. And up-- so I'm securing the bar so it doesn't go too much-- keep those feet hooked-- and lower down. And up. Now remove your feet. The next thing that I want to look at is the tightness that may be occurring through the sides-- so through that lateral line of fascia going through her obliques, as well as through the iliacus muscle, and continuing on to the IT band, going all the way up through the arm through the lats.
So she's going to turn around, and Mandy, you're going to face away from me. Notice how she got up on her side. Rolling onto her side would be safer for her. And I'm going to hook the push-through bar, so you can lower your head. And I'm going to take something like a roller to have her push her foot into-- to basically close this kinetic chain.
Now you're going to place your hand on the bar and push the bar away from you-- holding firmly so that I don't have to worry about my own face-- and you're going to push your heel into the roller, while you push the bar away from you. So let's have you hold that. Feel the stretch lengthening. Can you see that length that's occurring through the top waistline? And relax.
And push away. I'm going to guide her with my hands. I'm not doing a manipulation. I'm not doing an adjustment. I'm just guiding the tissue-- hardly any pressure.
And release. And I'd like you to swing your ribs backward as you push and lengthen-- there we go-- so that we free up some of that area around the diaphragm. And release. And one last time. Hold it, hold it, hold it.
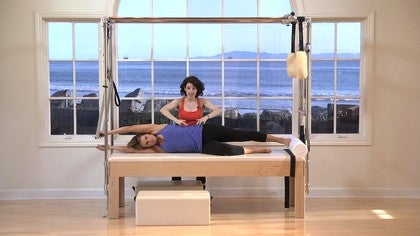
And I'm going to give you a little bit more of indication through the triceps of how you could let go there. And release. I got the bar, you can let go now, and you can sit up. The next thing I'd like to do is to help your inner thighs, which is going to free up your back. So you're going to straddle the Cadillac here, and I've placed a box on either side for underneath your feet.
This might be a little bit high for you, but that's OK. And you're going to see why in a moment. So she's going to pull the bar down. And she's now going to push forward. So if she didn't have a box to push her feet into, her feet would be dangling.
So we're offloading some of that weight. You're going to push forward, and I'm just going to guide you forward-- giving her a little bit of directional information through my hands-- and returning. And let the bar rise. And hinge forward. And returning.
Pull the bar down, push the bar forward, and I'm going to give her just a tiny bit of pressure into her thighs here. And returning. And push the bar up. And what I could also do is give her a little traction through her spine, which feels really wonderful. Now granted because I'm kind of short, I am standing on the box in order to have proper leverage.
But I'm also protecting my own body. So I have good form. I'm not hunching. I'm not taking the strain into my body at all. I'm taking it straight through my axial skeleton and then straight up through my arm.
Now I'd like you to straighten your knees and put them up against the vertical or put your feet against the vertical frames. So as long as she can sit here without discomfort in her hips-- that's great. Otherwise I would prop her up, say on a moon box. Pull the bar down. And push it straight forward.
Now I'm going to give you a little bit more direction. I'm going to grab the bar over here, and I'm going to instruct you to pull the bar away from me. Pause-- just meet my resistance there-- not too much. And now release. We're going to go a little bit further.
And pull the bar. And go a little bit further. And, last time, pull the bar. And now release a little bit further into it. And now slowly rise up, controlling it.
Allow your elbows to bend by your sides as the bar rises. Push the bar up. And I'm going to give her a little bit more assistance through my feet. So I'm pushing very gently, not much, but I'm going to slowly walk my feet up her back, not on her spine itself but along the erectors on the side of her back, giving her a little bit through the upper back, the shoulders, very gently. I'm not using much pressure.
I'm not pushing actively into the kidneys, et cetera. And you can pull the bar down. One more time. Notice how she has a little bit more release through the spine now. Let your head go.
Breathe in. And exhale slowly, rising back up. Elbows in. There you go. Let the bar rise.
And I'm going to give you a little bit more information in your body as I want the length to occur through your shoulders and the length to occur through your arms. So don't pull your shoulders down your back. Let them go. Let the bar rise. Let it go, let it go, let it go.
Half the time we're not releasing. Half the time our problem is from holding tension. And now slide your shoulders down your spine-- not down your back-- but down your spine. There we go. So that we get that nice upward rotation rather than a locking down of the shoulder girdle.
And you can remove your hands. I'm going to take the bar down. And the last thing that I'd like to do here is have you go into a lunge position. So you're going to stand up. And we're going to add in a little rotation as we do this as well.
Sorry, I'll get out of your way. You can lunge back, and I want you to lower your knee, your back knee. So I'm going to even out your hips, allowing you to sink down into this outside hip. There you go. So she's going to get a bit of a stretch through the hip flexor-- again another cause of stiffness through the back and tightness through the back.
And now let's just do a gentle motion as you shift your weight back. And now shift your weight forward. And shift your weight back. And shift your weight forward. And shift your weight back.
Now take this outside arm-- so the same arm as is the side of the kneeling knee-- reach for the bar but a little bit further behind you. And now twist to face away from me, just a gentle twist. Inhale. And exhale, return. And once again, inhale, twist-- so that we're getting this nice spiral and stretch through the back side here-- and return.
And last time. Spiral, and return. So even out your hands. Return that hand forward. And now walk your hands just a little bit further back.
There you go. I want you to now lift the knee. So we're going to fire the glutes. We're going to get everything to work functionally, which will also reduce some tension that she might be experiencing. And lower that knee.
And rise. There we go. So she just dropped the hip that was hiking a little bit. And rise. So we're getting adductors, we're getting glutes, both gluteus medius minimus, as well a little bit through the glute max.
We're getting hamstrings, quads, everything. Good. And last time. See if you could hold it without your hand. Great.
And lower yourself down. So those are a few of the techniques that I typically use when I'm working with my clients. I'll stand over here. So that when people are experiencing some stiffness or tightness, I will take them through a series of releases and stretches as well as trying to engage some of the musculature that we're talking about, regarding the core but also trying to get some of the hips and the global stabilizers to start kicking in, that will also offer some support. Thank you.
Back Care - Playlist 1: Workouts and Tips for a Healthy Spine
Mention
 |
Rebekah Rotstein (Teacher) |
 |
Elizabeth D |
 |
Nisha S |
|
|
Margaret R |
|
|
Julie K |
 |
Ionica C |
 |
Charlotte F |
 |
Kathrin S |
|
|
Angela B |
 |
Giglia M |
 |
David Sterry |
 |
Jamie H |
|
|
Debra H |
 |
Jacqueline D |
 |
Jennifer S |
 |
Sarah D |
 |
Ania Wojtera |
|
|
Avishag H |
|
|
Carol G |
 |
Lisa M |
|
|
Jannine M |
 |
Paola Maruca |
 |
Jo D |
 |
Myriam Kane |
|
|
Anita H |
|
|
Ann S |
 |
Chelsea S |
|
|
Usha D |
|
|
Rosemarie F |
 |
Idrienne S |
 |
Jamie K |
 |
Jocelyn N |
 |
Natalie I |
 |
Amy Havens |
|
|
Jeri Ann Alexander |
 |
Judy C |
 |
Annie M |
|
|
Anna A |
 |
Kathy O |
|
|
Terri K |
Comments


You need to be a subscriber to post a comment.
Please Log In or Create an Account to start your free trial.
